Basically I effort-posted over on a thread about controllers in General Gaming but no one is going to read it there and I don't want to let my effort-post go to waste, so I'm pasting it here in its own thread 
Analog drift comes from how the potentiometers interact within the analog module and cause the analog sensor to read "off center". Trying to modify the physical stick lever is mostly useless as anything that modifies how the physical stick itself operates wouldn't affect what's happening inside the potentiometer, so you can't "fix" analog drift by messing with the actual lever, the only real fix comes from replacing the potentiometers.
If replacing the part is out of the question the best thing one can do is to use third-party software like ReWASD, Anti-micro, or Steam Input, to make your own custom deadzones (area within which stick movement doesn't register as an input) so that the "drift" stays inside the deadzone. Obviously this is only a band aid as the bigger your deadzone the less 'responsive' your analog stick movement becomes, and after about 10-15% deadzone it really feels bad enough that it's not even worth using.
Most modern video games implement a basic 5% deadzone without telling you about it, specifically to combat analog drift. The deadzone originates from the center of the stick. This is why the camera movement doesn't begin to appear in the game until your stick has moved physically from the center. Some Japanese games even put in a 10% deadzone, usually Nintendo games, though I did find that the recent Tales of Arise used a monstrous 50% deadzone. Fortunately, nowadays more and more games are coming with in-game menu options for deadzone though, and that's nice. It's why suddenly even normies know about terms like 'response curve' and 'deadzone', mainly because games like Apex Legends and Fortnite allow you to customize your deadzone and analog response curve. Regardless this is still very much appreciated.
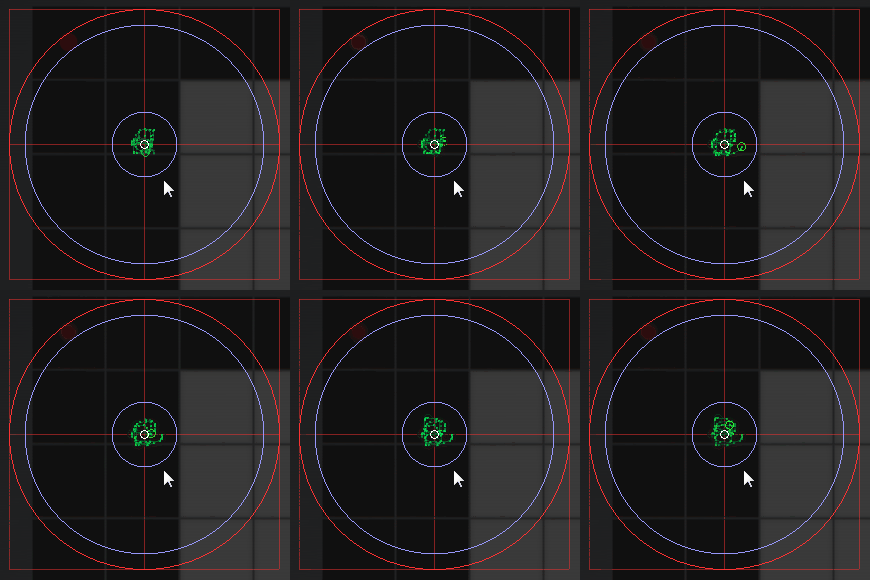
Here is a random gif I found showing a deadzone:

Based off eyeball estimation I'd say this is around a 20% deadzone. Any stick movement within that center circle won't be registered by the game. It's only after the green dot (the stick movement) passes outside the circle that the game registers an input. Analog 'drift' is when the green movement dot isn't centered and is instead 'drifting' off to a direction, and if it's severe enough it will be past most game's default deadzones and thus the camera or character will start 'moving by themselves'.
So yeah, you can technically "fix" drift by enlarging the deadzone but after a certain percentage it basically becomes unusable anyway. Personally I can't stand playing with more than 10% deadzone.
Oh, and you can also use those same programs I mentioned to "override" the game's default deadzone and implement your own. I currently use a 4% deadzone on most games, so it's pretty damn responsive, and I also like using what they call "dynamic" response curves (though I also use linear curves too). Most games use either a linear response curve (degree of analog movement equates to% of acceleration), or what's called a "wide curve" where it's a sagging linear curve. Some image examples:

So basically, as you can see there, a standard linear response curve means that when your analog stick is at 20% 'tilt' it will be outputting 20% acceleration. It should be:, but curves can be modified using acceleration and deceleration modifiers.
The blue line in that image is an example of a "wide" response curve, it's essentially similar to a linear curve except it accelerates "slower", i.e. when the stick is moved 20% it's accelerating at around 10%. Something that helps is to visualize analog response as steering a ship, with modifiers which make it go faster or slow it down, and the rotational axis is tilted by degrees through movement of the stick lever.
A 'dynamic' curve is like an S curve, or a reverse S curve, where it accelerates more quickly in the beginning of the stick movement (first 50 degrees), and then the line sags downward for the remaining half. The reverse S curve is the opposite, with very slow acceleration during the first 50 degrees of movement and then line shoots up afterwards.
When in doubt, go default linear. Annoyingly some games use wacky acceleration modifiers and it's very useful to override them with input software like ReWASD, Anti-micro or Steam Input. Yet another benefit of gaming on PC, you can't use any of this stuff if you're stuck on console.
Here's a photo of my current ReWASD response curve for Shadow of the Tomb Raider:

It's not "universal" because some games utilize hidden acceleration/deceleration modifiers which can't be disabled, such as this game. Tomb Raider 3 here has a hidden deceleration modifier which ReWASD nor Steam Input are capable of overriding, which is why I'm using such aggressive acceleration; when my analog stick is at 20% it's already steering around 30% of acceleration, and by the time my stick is tilted 30% it's already steering around 70% of the total acceleration.
For first-person camera games I use a reverse S curve. Slow movement in the first 50 degrees then fast movement in the latter final 50 degrees, though I also like using them. I can go either way, depends mostly on whether the particular game does anything wacky on its input handling; most modern games have stopped adding hidden modifiers but there's always that one exception.
BTW, you can also outer deadzones to have the maximum acceleration range arrive faster; that is to say if you want your stick to reach the maximum acceleration provided by your curve at an earlier moment, say at 80 degrees of tilt have the stick reach 100% of the curve, then you would use a 20% OUTER deadzone. This is what the 3rd little ball is doing in that ReWASD screenshot I posted, at around 80 degree tilt of the stick it has already reached the maximum speed of the provided curve.
A lot of games actually do this because an outer deadzone also helps counter the effects of stick drift. If your stick has a 5% drift off to the left of the X axis, that means that that direction cannot reach 100% output and will instead be capped to 95% because of the drift, so analog drift also robs you of maximum potential output, though this is less noticeable in games because the latter rotational degrees of an axis are simply less important than the first ones (most fine movement is performed within the first 30 degrees of rotation).
In fact I think most games ship by default with a 10% outer deadzone, which means the stick has reached the maximum possible acceleration by the time it has covered 90% of the travel distance, or the axis has rotated 90 degrees.
OK, another way of explaining it is: if you set a 20% Outer Deadzone it doesn't mean you lose the final 20% of your analog control, rather what it means is that the length of the curve is shortened by 20%, so it acts as its own kind of acceleration because now the actual length of the curve has been shortened by 20% thus every degree arrives 20% faster.
You can also use a lower maximum acceleration point , if you want, say for example if you want to use a linear response curve but you find that 80% speed is already "fast enough" for you, instead of using an outer deadzone what you do is lower the maximum acceleration point from 100% to 80%; in that ReWASD screenshot I'm using around a 15% outer deadzone and also around a 95% maximum acceleration value (instead of a possible 100%). An outer deadzone, by itself, can act as an acceleration modifier, and in fact many games do use it specifically for that.
The way Steam Input visualizes it for you is a lot easier to understand, since it uses circles that expand outward or inward to denote the deadzones, but ReWASD is ultimately better because it allows you to be more precise in how you set them up because it lets you input raw numbers and manipulate the curve directly at 4 different points.
In ReWASD the 1st "ball" is the inner deadzone, the "normal" deadzone most people are talking about when they talk about deadzones, and the final 4th "ball" in that line is the outer deadzone.
EDIT: An additional curve screenshot for another game, in spoiler because this isn't really meant to be a ReWASD thread, and Steam Input uses a completely different GUI so more ReWASD screenshots won't help. I do recommend ReWASD to make your custom response curves and deadzones but Steam Input can accomplish the task as well and it's free, just look up a YouTube tutorial on how to use Steam Input deadzone/anti-deadzone options.
Analog drift comes from how the potentiometers interact within the analog module and cause the analog sensor to read "off center". Trying to modify the physical stick lever is mostly useless as anything that modifies how the physical stick itself operates wouldn't affect what's happening inside the potentiometer, so you can't "fix" analog drift by messing with the actual lever, the only real fix comes from replacing the potentiometers.
If replacing the part is out of the question the best thing one can do is to use third-party software like ReWASD, Anti-micro, or Steam Input, to make your own custom deadzones (area within which stick movement doesn't register as an input) so that the "drift" stays inside the deadzone. Obviously this is only a band aid as the bigger your deadzone the less 'responsive' your analog stick movement becomes, and after about 10-15% deadzone it really feels bad enough that it's not even worth using.
Most modern video games implement a basic 5% deadzone without telling you about it, specifically to combat analog drift. The deadzone originates from the center of the stick. This is why the camera movement doesn't begin to appear in the game until your stick has moved physically from the center. Some Japanese games even put in a 10% deadzone, usually Nintendo games, though I did find that the recent Tales of Arise used a monstrous 50% deadzone. Fortunately, nowadays more and more games are coming with in-game menu options for deadzone though, and that's nice. It's why suddenly even normies know about terms like 'response curve' and 'deadzone', mainly because games like Apex Legends and Fortnite allow you to customize your deadzone and analog response curve. Regardless this is still very much appreciated.
Here is a random gif I found showing a deadzone:

Based off eyeball estimation I'd say this is around a 20% deadzone. Any stick movement within that center circle won't be registered by the game. It's only after the green dot (the stick movement) passes outside the circle that the game registers an input. Analog 'drift' is when the green movement dot isn't centered and is instead 'drifting' off to a direction, and if it's severe enough it will be past most game's default deadzones and thus the camera or character will start 'moving by themselves'.
So yeah, you can technically "fix" drift by enlarging the deadzone but after a certain percentage it basically becomes unusable anyway. Personally I can't stand playing with more than 10% deadzone.
Oh, and you can also use those same programs I mentioned to "override" the game's default deadzone and implement your own. I currently use a 4% deadzone on most games, so it's pretty damn responsive, and I also like using what they call "dynamic" response curves (though I also use linear curves too). Most games use either a linear response curve (degree of analog movement equates to% of acceleration), or what's called a "wide curve" where it's a sagging linear curve. Some image examples:

So basically, as you can see there, a standard linear response curve means that when your analog stick is at 20% 'tilt' it will be outputting 20% acceleration. It should be:, but curves can be modified using acceleration and deceleration modifiers.
The blue line in that image is an example of a "wide" response curve, it's essentially similar to a linear curve except it accelerates "slower", i.e. when the stick is moved 20% it's accelerating at around 10%. Something that helps is to visualize analog response as steering a ship, with modifiers which make it go faster or slow it down, and the rotational axis is tilted by degrees through movement of the stick lever.
A 'dynamic' curve is like an S curve, or a reverse S curve, where it accelerates more quickly in the beginning of the stick movement (first 50 degrees), and then the line sags downward for the remaining half. The reverse S curve is the opposite, with very slow acceleration during the first 50 degrees of movement and then line shoots up afterwards.
When in doubt, go default linear. Annoyingly some games use wacky acceleration modifiers and it's very useful to override them with input software like ReWASD, Anti-micro or Steam Input. Yet another benefit of gaming on PC, you can't use any of this stuff if you're stuck on console.
Here's a photo of my current ReWASD response curve for Shadow of the Tomb Raider:

It's not "universal" because some games utilize hidden acceleration/deceleration modifiers which can't be disabled, such as this game. Tomb Raider 3 here has a hidden deceleration modifier which ReWASD nor Steam Input are capable of overriding, which is why I'm using such aggressive acceleration; when my analog stick is at 20% it's already steering around 30% of acceleration, and by the time my stick is tilted 30% it's already steering around 70% of the total acceleration.
For first-person camera games I use a reverse S curve. Slow movement in the first 50 degrees then fast movement in the latter final 50 degrees, though I also like using them. I can go either way, depends mostly on whether the particular game does anything wacky on its input handling; most modern games have stopped adding hidden modifiers but there's always that one exception.
BTW, you can also outer deadzones to have the maximum acceleration range arrive faster; that is to say if you want your stick to reach the maximum acceleration provided by your curve at an earlier moment, say at 80 degrees of tilt have the stick reach 100% of the curve, then you would use a 20% OUTER deadzone. This is what the 3rd little ball is doing in that ReWASD screenshot I posted, at around 80 degree tilt of the stick it has already reached the maximum speed of the provided curve.
A lot of games actually do this because an outer deadzone also helps counter the effects of stick drift. If your stick has a 5% drift off to the left of the X axis, that means that that direction cannot reach 100% output and will instead be capped to 95% because of the drift, so analog drift also robs you of maximum potential output, though this is less noticeable in games because the latter rotational degrees of an axis are simply less important than the first ones (most fine movement is performed within the first 30 degrees of rotation).
In fact I think most games ship by default with a 10% outer deadzone, which means the stick has reached the maximum possible acceleration by the time it has covered 90% of the travel distance, or the axis has rotated 90 degrees.
OK, another way of explaining it is: if you set a 20% Outer Deadzone it doesn't mean you lose the final 20% of your analog control, rather what it means is that the length of the curve is shortened by 20%, so it acts as its own kind of acceleration because now the actual length of the curve has been shortened by 20% thus every degree arrives 20% faster.
You can also use a lower maximum acceleration point , if you want, say for example if you want to use a linear response curve but you find that 80% speed is already "fast enough" for you, instead of using an outer deadzone what you do is lower the maximum acceleration point from 100% to 80%; in that ReWASD screenshot I'm using around a 15% outer deadzone and also around a 95% maximum acceleration value (instead of a possible 100%). An outer deadzone, by itself, can act as an acceleration modifier, and in fact many games do use it specifically for that.
The way Steam Input visualizes it for you is a lot easier to understand, since it uses circles that expand outward or inward to denote the deadzones, but ReWASD is ultimately better because it allows you to be more precise in how you set them up because it lets you input raw numbers and manipulate the curve directly at 4 different points.
In ReWASD the 1st "ball" is the inner deadzone, the "normal" deadzone most people are talking about when they talk about deadzones, and the final 4th "ball" in that line is the outer deadzone.
EDIT: An additional curve screenshot for another game, in spoiler because this isn't really meant to be a ReWASD thread, and Steam Input uses a completely different GUI so more ReWASD screenshots won't help. I do recommend ReWASD to make your custom response curves and deadzones but Steam Input can accomplish the task as well and it's free, just look up a YouTube tutorial on how to use Steam Input deadzone/anti-deadzone options.
EDIT: Here is a screenshot of my curve for Kena - Bridge of Spirits:


Last edited:


